First Posted on Wednesday November
6th, 2002
|
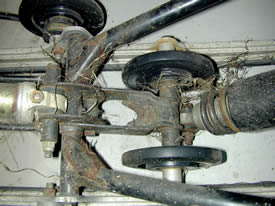
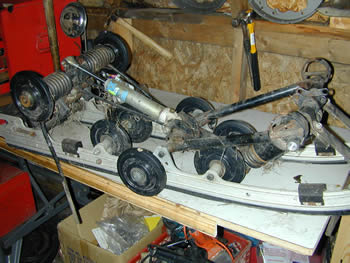
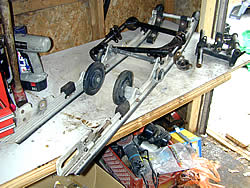
Today I tore down the rear suspension.
I had a couple of things in mind when I did this. One, all of
the bearings in the wheels needed service or replacement. The
steel A-frames were showing some rust, and that needed to be
addressed before it went from surface rust to a structural issue.
They will get wire wheeled, degreased and painted with a high
quality paint. Finally, it involved a general cleaning, polishing
and greasing of the shafts and such.
Tearing down the skid frame
is really just rote disassembly, so I won't cover it in great
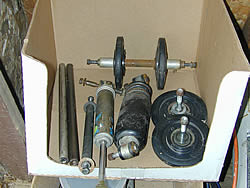
detail. There are a few key things to remember though.. The first
is to be orderly about it. I keep the parts lined up in sub-assemblies
so that they go back on the same way they came off. It saves
a lot of hunting for parts and a lot of re-work. |
|
My sled has Fox shocks on it, and those need
a little extra attention. It was the recommendation at the dealership
that they be rebuilt on a yearly basis, though few people did.
I have seen the inside of a year old shock that was just full
of rust water, and yes, it sure needed attention. On this sled,
they still have the same gas that they had when they built it
in '94. I am rolling the dice to be sure. Not only could they
meltdown/blowout and end a weekend of riding, they are really
expensive. They are a nitrogen charged shock with adjustable
valving that runs $200-300 to replace. Maintaining them seems
to be the better bet. They really take the majority of the beating.
They are not something you can do at home. They are charged to
like 2000 psi, not something to tinker with at all. |
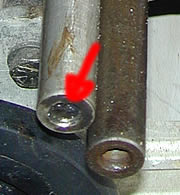 |
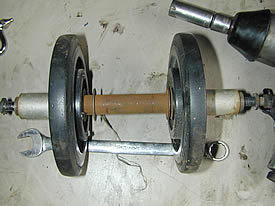
The other thing, and this is really important..
is to make sure that the shafts that get cleaned and greased
don't have grease in the bolt holes. These holes and bolts should
always be cleaned with a grease free solvent and blown out with
compressed air. The only thing that holds these bolts in through
all of the pounding is the Loc-tite. Loc-tite does not lock tight
when the threads are coated with grease. This is a sure fire
way to have a suspension melt down on you if you skip this step. |
|
I started in the front, pulling the limiter
strap, shock and eventually the A arm. I did take pictures so
it would all be the same on the way back together. Again, there
is nothing fancy here, just basic disassembly. |
 |
 |
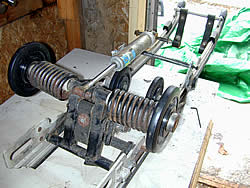
The back carrier was equally simple, just
one bolt at a time until I was down to the rails. I did leave
a couple of the cross shafts in between the rails to keep it
as a unit, but other than that, it came off of the rails. |
|
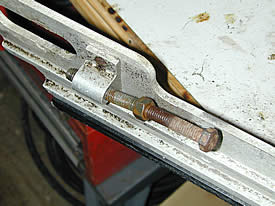
I did encounter some problems along the
way. One was the track adjusting screws had seized inside the
rail. Even my biggest impact couldn't snap it loose, though it
did give it a nice twist.
These are an ongoing problem across the
brands, and it is just sad. We have sleds that do 120 in 800',
but putting a dab of never-seize here is beyond the manufacturers. |
 |
I know that the Cats had the riveted on
piece available separately (~~$15), but if memory serves me,
Polaris had you replace the rail. I could be wrong. These rails
have not been otherwise damaged, and if it is only available
as an assembly, I will be going with either the cat part or one
that I machine. Polaris is still in the dark ages of on-line
parts sales, but I looked up the rails on the same year cat,
and they were ~$120 each. Not gonna do it..
The other problem I encountered was that
most of the wheel bearings were junk. Even after being cleaned
out as described in the last report, they were not worth saving.
The balls that run in the bearing race had rusted and were pitted.
While they would have probably held up a few seasons with repacking,
I am not willing to bet valuable trail time on that, or worse,
have it come loose and damage the suspension or track.
As we covered in the last update, bearings
are cheap if you buy them from the bearing dealer and not the
snowmobile dealer. I Iooked up the bearing number on the net,
and found the manufacturer store. It has them in 2 or 4 packs
for $16 and $30 Canadian, or $10.25 and $19.20 American at this
moment's current exchange rates. Compare that to the dealer price
of $14.95 each and you understand why I advocate going direct
on these. Replacing all 6 is about thirty bucks direct vs $90
at the dealer. I support my dealer, but I like my way $60 better.
Most of us have NTN bearings in our sleds.
Some use other brands, but these are the common ones in mine.
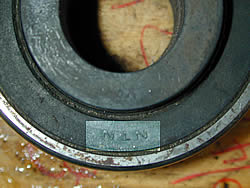
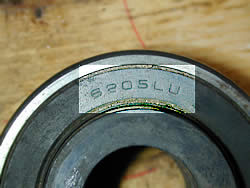
Identifying your bearing is half of the battle. Sometimes the
manufacturer name and part number is lazer cut into the outer
race of the bearing, sometimes on the edge, sometimes on the
outer diameter. In many cases, it is the name and number on the
oil seal as shown below.
On the left, I see that I do indeed have
an NTN bearing, on the right I see that it is a 6205LU, a common
bearing.
With the exception of servicing the high-end
shock absorbers, tearing down a suspension is no big deal, it
really isn't. You need to be meticulous about the order of the
parts for reassembly, and you need to remember to keep bolts
and bolt holes grease free. Beyond that, most of it is cleaning,
greasing, and replacement of parts.
As far as specialty tools, I used a snap
ring pliers on the wheel bearing circlips and an impact wrench
on the bolts. Beyond that, it was basic sockets, hammer, and
normal hand tools.
If an ounce of prevention is really worth
a pound of cure, an hour in the shop doing preventative maintenance
saves 16 hours of trail time missed because the sled is broken..
See you on the trail!
RJB |